Table of Contents
Throughout my journey as Developer, I’ve realised the importance of visualising data effectively, especially in Salesforce environments. That’s where Chart.js, a powerful and versatile JavaScript library, comes into play. It enables developers to create visually appealing and interactive charts to enhance data-driven decision-making.
In this guide, I’ll walk you through the basics of Chart.js, its integration with Salesforce, and how you can use it to improve data presentation within your CRM.
What is Chart.js?
Chart.js is a popular open-source JavaScript library that enables developers to create simple yet flexible charts with minimal effort. It supports a variety of chart types, including:
- Bar Charts: Ideal for comparing different categories of data.
- Line Charts: Perfect for visualizing trends over time.
- Pie & Doughnut Charts: Great for showing proportional data.
- Radar Charts: Useful for comparing multiple quantitative variables.
- Bubble & Scatter Charts: Used for statistical analysis and showing relationships between variables.
Since Chart.js is lightweight and responsive, it is an preferred option for Salesforce developers who are looking to enhance their dashboards with dynamic and interactive data visuals.
Why use Chart.js with Salesforce?
Salesforce is a powerful CRM platform that helps businesses manage their customer relationships and data. However, its reporting tools can sometimes be limited in terms of interactivity and customization. Integrating Chart.js with Salesforce allows developers to:
- Enhance Data Presentation: Create custom dashboards that are visually engaging.
- Improve Decision Making: Present data in an easily format.
- Customize Charts: Tailor data visualization to specific business needs.
- Ensure Real-Time Updates: Sync Salesforce records dynamically with Chart.js components.
By combining the power of Salesforce with the flexibility of Chart.js, we can create custom dashboards and reports that are visually appealing and easy to understand.
Getting Started with Setting Up Chart.js in a Salesforce Environment
1. Setting Up Your Environment
Before integrating Chart.js, ensure that you have a Salesforce Developer Edition or a Salesforce sandbox account where you can create and test your components.
2. Installing Chart.js
To use Chart.js in Salesforce, you need to include its library in your Lightning Web Component (LWC). You can do this by:
- Downloading the Chart.js file (Open link -> Right Click -> Save As) and uploading it as a static resource in Salesforce.
- Alternatively, obtaining the library from the Chart.js website and saving it as
ChartJsin your Salesforce static resources.
3. Creating a Lightning Web Component
Once Chart.js is installed, the next step is creating a Lightning Web Component that integrates it. Below is a sample code implementation:

// chart.js

import {LightningElement, api, track} from 'lwc';
import chartjs from '@salesforce/resourceUrl/ChartJs';
import {loadScript} from 'lightning/platformResourceLoader';
import {ShowToastEvent} from 'lightning/platformShowToastEvent';

export default class Chart extends LightningElement {
 @api loaderVariant = 'base';
 @api chartConfig;

 @track isChartJsInitialized;
 renderedCallback() {
  if (this.isChartJsInitialized) {
   return;
  }
  // load static resources.
  Promise.all([loadScript(this, chartjs)])
   .then(() => {
    this.isChartJsInitialized = true;
    const ctx = this.template.querySelector('canvas.barChart').getContext('2d');
    this.chart = new window.Chart(ctx, JSON.parse(JSON.stringify(this.chartConfig)));
    this.chart.canvas.parentNode.style.height = 'auto';
    this.chart.canvas.parentNode.style.width = '100%';
   })
   .catch(error => {
    this.dispatchEvent(
     new ShowToastEvent({
      title: 'Error loading ChartJS',
      message: error.message,
      variant: 'error',
     })
    );
   });
 }
}
In the above code, I have declared two @api attributes in the chart component
- loaderVariant: Used to set the loader variant from the parent component.
- chartConfig: Used to pass the chart settings and data from the parent component, so that we can reuse this component for different charts.
<!-- chart.html -->

<template>

   <div class="slds-p-around_small slds-grid slds-grid--vertical-align-center slds-grid--align-center">

     <canvas class="barChart" lwc:dom="manual"></canvas>
     <div if:false={isChartJsInitialized} class="slds-col--padded slds-size--1-of-1">

     <lightning-spinner alternative-text="Loading" size="medium" variant={loaderVariant}></lightning-spinner>

     </div>
    </div>

</template>
4. Fetching Data from Salesforce
Now, create an apex class to fetch the Opportunity Data.
//chartdemo.cls

public class chartdemo
{
    @AuraEnabled(cacheable=true)
    public static List<AggregateResult> getOpportunities()
    {
       return [SELECT SUM(ExpectedRevenue) expectRevenue, SUM(Amount) amount, StageName stage

       FROM Opportunity WHERE StageName NOT IN ('Closed Won') GROUP BY StageName LIMIT 20];

    }
 }
5. Integrating Data with the Chart Component
chartDemo.js (JavaScript Controller) Create another Lightning Web Component, give it name as per your reference
// chartDemo.js

import { LightningElement, wire } from 'lwc';
import getOpportunities from '@salesforce/apex/chartdemo.getOpportunities';

export default class ChartDemo extends LightningElement {
chartConfiguration;
    @wire(getOpportunities)
    getOpportunities({ error, data }) {
        if (error) {
            this.error = error;
            this.chartConfiguration = undefined;
        } else if (data) {
            let chartAmtData = [];
            let chartRevData = [];
            let chartLabel = [];
            data.forEach(opp => {
                chartAmtData.push(opp.amount);
                chartRevData.push(opp.expectRevenue);
                chartLabel.push(opp.stage);
            });
            this.chartConfiguration = {
                type: 'bar',
                data: {
                    datasets: [{
                        label: 'Amount',
                        backgroundColor: "green",
                        data: chartAmtData,
                    },{
                        label: 'Expected Revenue',
                        backgroundColor: "orange",
                        data: chartRevData,
                    },],
                    labels: chartLabel,
                },
                options: {},
            };
            console.log('data => ', data);
            this.error = undefined;
        }
    }
}
<!-- chartDemo.html -->
<template>
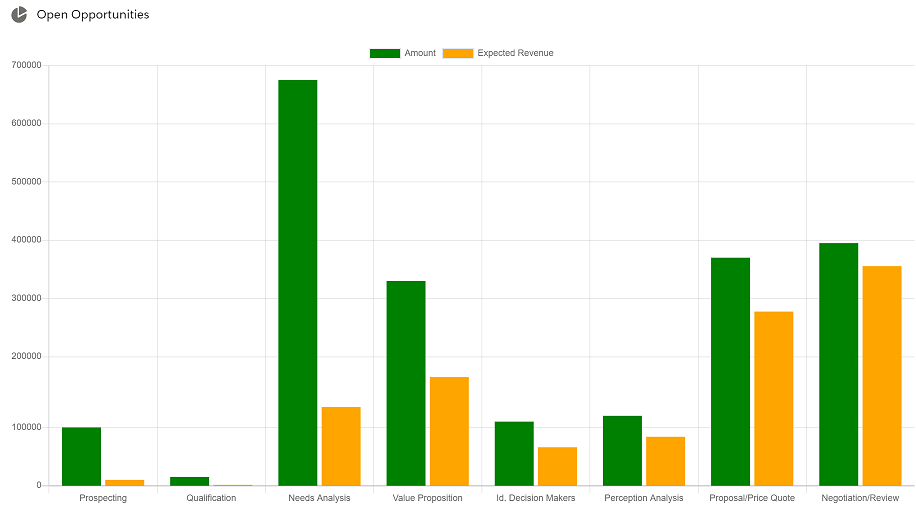
<lightning-card title="Open Opportunities" icon-name="utility:chart">
<template if:true={chartConfiguration}>
<c-chart chart-config={chartConfiguration}></c-chart>
</template>
</lightning-card>
</template>In the HTML we have called the chart component and set the chart-config parameter.
6. Adding the Component to a Lightning Page
Finally, add your new component to a Lightning page to see the chart in action. You can do this by editing a Lightning page and dragging your component onto the page.
Output:-

Conclusion
Integrating Chart.js into Salesforce provides businesses with an enhanced way to visualize and analyze data. Whether tracking sales performance, monitoring customer satisfaction, or generating real-time dashboards, Chart.js transforms raw Salesforce data into actionable insights that are easy to interpret and share with your team.
Data visualisation is a powerful tool that can significantly enhance the decision-making process in any organisation.
With this hands on guide, you can now start using Chart.js to create dynamic charts in your Salesforce applications and elevate your CRM’s data visualization capabilities.
FAQs
1. Can I use Chart.js with Salesforce reports?
Yes, you can extract report data using Apex and visualize it using Chart.js.
2. Does Chart.js support real-time updates?
Chart.js does not have built-in realtime support, but you can update the chart manually using Salesforce data changes.
3. What types of charts are supported?
Chart.js supports bar, line, pie, radar, scatter, and more, making it highly flexible for data visualization.
4. How do I deploy this component?
You can add the LWC to a Lightning App Page or embed it within a Salesforce Lightning Record Page.
Thank you for reading, and happy coding!
